Cloth Nappy Fitting Guide
1. Insert Placement
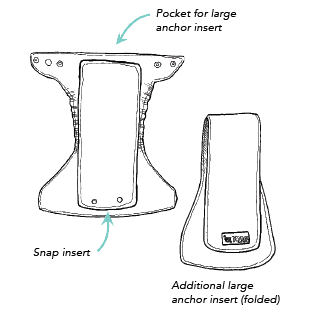
Open up the nappy shell and snap the small insert into the two corresponding snaps inside the lining at the top of the shell. This one insert might be sufficient for younger infants, as you are changing more often.
For increased absorbency, fold the large anchor insert in half and place on top or under the snap-in insert as you prefer. The larger end works best pointing towards the back of the nappy, but all inserts can be changed and configured to suit your needs and preference. There is an optional pocket in the back of the shell where boosting can be placed instead of laying inside or adding additional absorbency if needed.
You’ll know when you need to add extra absorbency as the inserts will be soaked through at change time and the time between changes decreases.
2. Correct Sizing
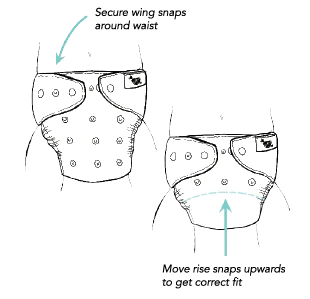
The rows of snaps on the front of the nappy offer three rise setting sizes and allows customisation of the fit around the legs as the baby grows from newborn to toddler. The waist band snaps at the top of the nappy and on the wings enable various size options around the waist.
For newborns, the wing snaps can overlap to the corresponding wing to make a very small fit. Our nappy is a trim OSFM (One size fits most) from approx. 3.5 kgs to 15-17kgs (depending on individual shape). You may find that you need to adjust the rise settings up or down at different ages as your child goes through various stages of growth and development.

3. Fitting
Open the un-snapped nappy shell with your preferred inserts placed inside, and then lay the baby on top of the shell. Make sure the back elastic is sitting just above the child’s bottom and then lift the front of the nappy forward just above the hips and under the belly button, making sure the leg elastics are right inside the groin crease.
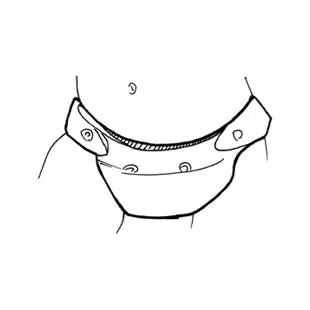
Next, hold the front in place as you stretch the elastic on the wings outward and then bring back towards the waistband to find the corresponding snap that comfortably meets around the waist. If needed pull the whole shell up a little higher to ensure the bottom is fully covered and it is not too low or digging.
4. Adjustments
Once the waist is adjusted, check to see if there is any baggy fabric between the legs. The inserts should be firmly secured against the baby and sitting flat with no gaps around the legs or parts hanging out to avoid liquid rolling out.
If needed, shorten the front of the nappy to make it trimmer by snapping up the next row of rise snaps. Refer to fitting images above.
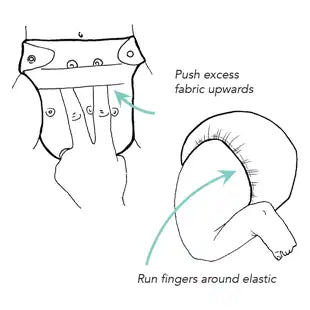
5. Perfecting
Push the excess fabric between the row of rise snaps upward so it is tucked flat and neatly inside the shell. Run your finger around the leg elastics and ensure they are sitting like underwear both on the front and back.
Check that you can fit two fingers in the waist band to ensure it is not too tight and allows space for when the baby is sitting up and make sure the leg and back elastics are not digging or uncomfortable.
Tips
Babies grow rapidly and their bodies change, so you will need to re-adjust your fit often. Test a few different sizing options to see what is working best in terms of comfort and absorbency.
Don’t be concerned if your baby is already on the largest settings, peak chub is generally before 12 months and they slim down as they begin to walk and reach the toddler years.
If you are seeing sagging in the front or large leg or tummy gapes and leaking out the legs, you may need a smaller size setting in the front rise, the waist settings or both.
If you are getting deep red marks or indentations on the hips or legs that do not go away quickly from the wings, back or leg elastics you may need a larger size or to re-adjust your insert configuration.
Once you change the rise you may also need to adjust the waist accordingly and pull the whole shell up higher at the front and back of the waist.
Still have a question or feeling unsure?
Join Designer Bums VIPs on Facebook for personalised assistance from our team of fitting experts and wonderful community of parents.


